
0800 864 272
09 600 1042
021 0291 5988
Email Us: info@gdsltd.co.nz
218a Swanson Road
Henderson, Auckland

1. Check your daylight opening measurement is accurate. Daylight opening is from the bottom of the floor rebate to the underside of the top fascia and from the inside of the left fascia to the inside of the right fascia.
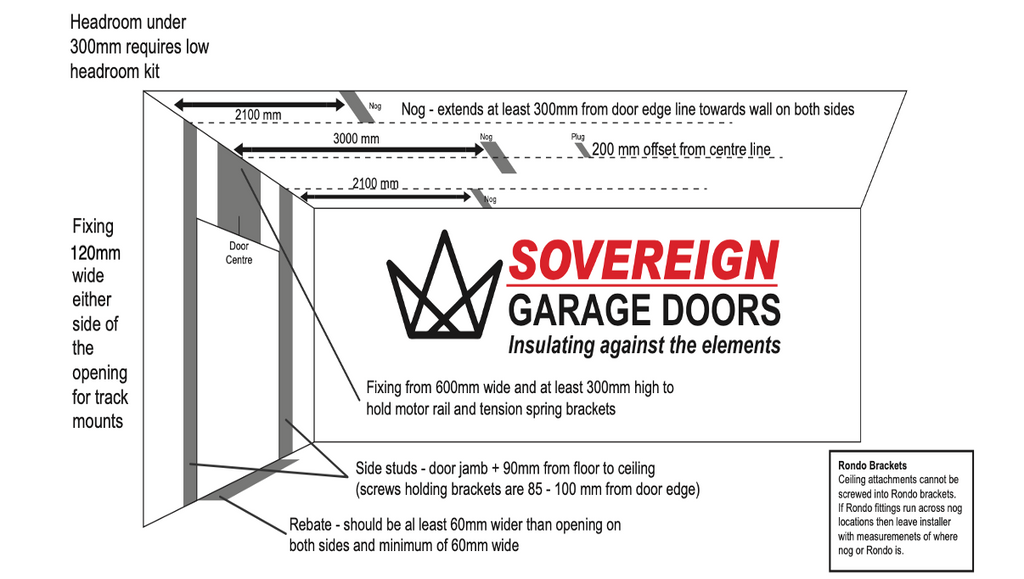
2. Check your headroom. Headroom is from the bottom of the top fascia to the ceiling, or any beam etc lower than the ceiling in the area the door operates.
Anything under 300mm will require a low headroom kit, which can be ordered with the door.
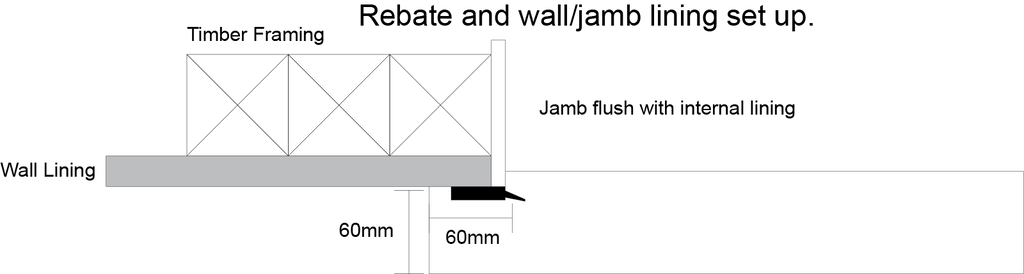
1. The front wall of your garage must be lined with plasterboard or ply prior to fitting a sectional garage door. It is preferred that the ceiling is also lined, but not as critical.
2. Due to the Sovereign weather seals, the garage wall lining needs to be flush with the fascia board. It is not necessary to finish the join as it is covered by the weather seal system.
3. The floor rebate should be a minimum of 60mm longer than the opening on both sides and should be a minimum of 60mm wide.

1. Either side of the opening a minimum of 120mm wide the height of the wall for the track brackets.
2. The center of the wall above the door for the opener track mount, spanning 400mm either side of the center for mounting of the door springs.
3. The horizontal top tracks require a nog in the ceiling 2100mm back from the front wall 30mm either side of the opening, and the opener needs a nog in the center 3000mm back from the wall.
1. Please ensure that at least half of the garage is available for the installer to work on the door.
2. Please allow the installer vehicle access as close to the opening as possible.
Warning: Delays caused by failure to adhere to this checklist may incur additional installer charges


1. Check the remote, Press any button and a red light should show.
2. Press CODE on the motor. The LCD will display “Su”.
3. Press a button on the remote (not the one with a lock on it) then release “Su” will flash, press the same button again till “Su” flashes fast, then goes away.
4. It will then show “- -“ to show the setting is complete.
For more sectional garage door details and installation preparation tips explore our comprehensive FAQs page, where you will find information on the types of sectional garage doors available, insulation options, and customisation features, to help you select the door that fits your functional needs and aesthetic preferences.